A great time of year to start planning for all those christmas presents etc, and to maybe get one or 2 of them done ? well this year I have been super organised and started making albums for all my friends and family, and I thought I would share with you :)
In store we have these little beauties available as a bundle and at a reasonable price ! read on to find out what you can do with yours and a little imagination! :) CLICK HERE to Purchase
So here are some pictures of the album made with the above 2 stunning papers, my craft stash and some imagination :)
Please note all of the following images are subject to copyright:
So let's get started.
Here are some the items I used in this album:
- Claudine Helmuth - Sticky Backed Canvas
- Grungeboard - Tim Holtz
- Distress Ink staines in Charcoal Black & fired Brick
- Galaxy Gold Ink
- Glimmermist in Black Gold, Red Velvet & Irridescent Gold. forest green
- Glimmer Glam Be Positive & Golden Goddess
- Tim Holtz Dies - Hardware Findings, Tattered florals & Tattered Leaves
- Tim Holtz Tissue Tape - Christmas
- Christmas Rubons Kaisercraft
- Miscellaneous stamps
- Black Cardstock
- Maya Road Bingo Chips
- Little Yellow Bicycle Tis the Season embellishments
- Do Crafts mini Christmas Tree embossing folder
- Dusty Attic Mini Chipboard embellishments
- Kaisercraft Velvet sticky backed
- Miscellaneous brads, charms embellisments etc
- Cherry Organza ribbon, Green Tara ribbon, twine.
- Distress Stickles Picket Fence
On your sheet titled "santa claus" push out the piece as abov, then cut around the shape like below.
For now it is important to keep all the pieces you have cut out these may be used later on.
DONT THROW ANY PIECES AWAY
The white section with the Christmas medallion is your front cover
 |
| Now lets continue getting all of your other pages for the album together | | |
|
|
|
I have cropped the edges of all the square pages using a Tim Holtz die : Brackets - Dont forget to keep those scraps for later on :)
I distressed all the edges of my pages
Ok so then with the front cover I cut out the medallion, so that I could relocate it slightly over on the cover. Then on the inside cover I placed some black cardstock.
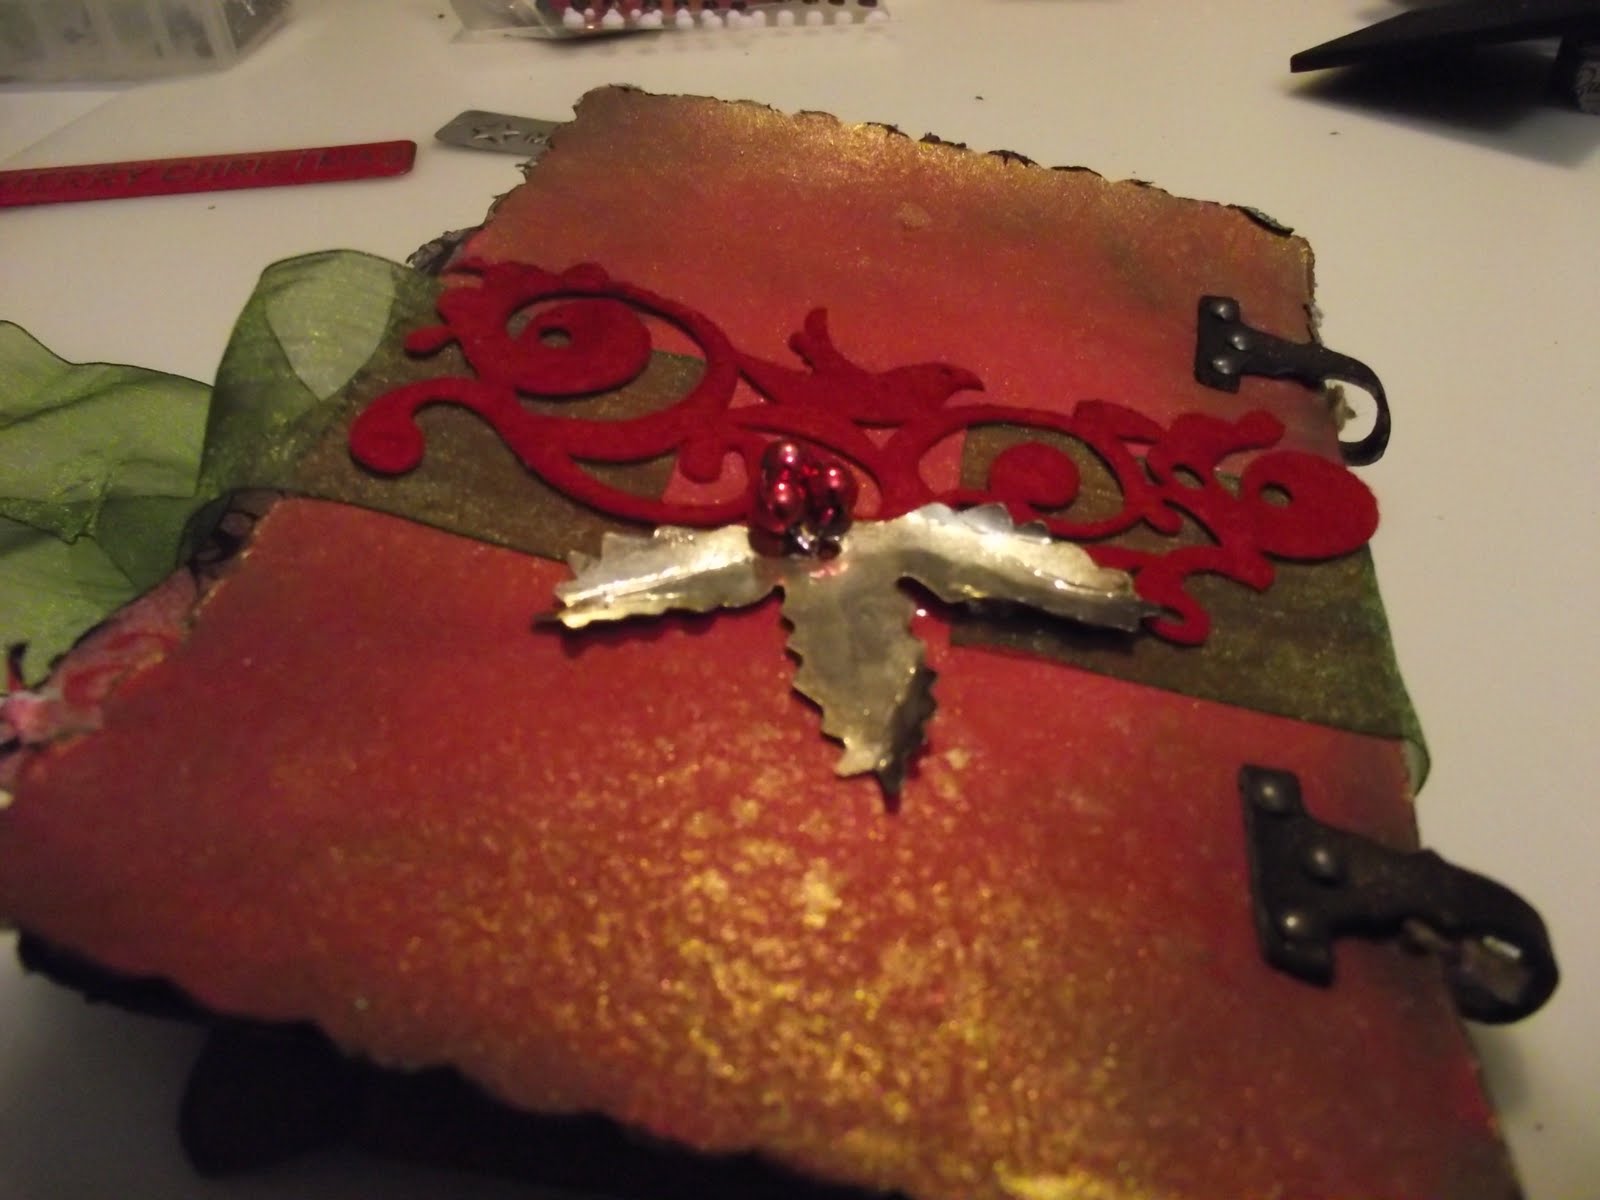
The front cover was Glimmermisted with Red velvet a little Black gold, and when dry I edged with Blacksoot distress ink and the Galaxy Gold ink.
I picked up the excess glimmermist that was left on the mat with the inside cover.
Here is the back piece, in the picture it looks a little green, I added a tiny amount of forest green glimmermist.
The best way to get this effect is to spray your piece, cover with a paper towel and then roll over the top of it with a brayer.
 |
| Use a mini tree embossing folder to create your own embellies |
I used the galaxy gold ink, and lightly rubbed it all over the embossed cardstock to bring out the patterned image.
Here is what I used when making the flowers and leaves used on the front cover, I stuck the canvas to Grungeboard before I ran it thru the cutting machine.
I painted the die cut canvas and grungeboard pieces with Gimmer Glam in Be Positive and Golden Goddess and the leaves in Glimmermist Forest Green. Then set them aside to dry. Once dry they were given a little distress stickles picket fence to give them that frosted look.
On the back cover I made 2 slits to create a feed for a ribbon that can be used to tie it all together to keep it protected.
This shows the back inside cover, now all you need to do is cover that piece with some cardstock or an embellishment.
Here is the back inside cover - the ribbon has been completely covered so you can't even see it :)
Then on the back cover outside i covered the ribbon slide with some velvet sticky backed trim, and a metal piece of holy that I saved from a christmas cracker one year.(waste not want not!)
I tied the album together with twine (making holes in each sheet and then threading through the twine or similar)
I then added some Grungeboard Hinges cut out of the Tim Holtz Hardware Findings die.
The completed album
Now read on to see each page of the album.
Front Cover
 |
| Page 1 (inside cover) and Page 2 |
Page 3 and 4
Page 5 & 6
Page 7 & 8
Page 9 & 10
Page 11 & 12
(back inside cover)
Back Cover
VOILA!
One completed Christmas Album, Check ! ;)
I hope you enjoyed reading this as much as I enjoyed making the album from 2 sheets of paper, my stash and some imagination. I love the challenges, and I hope you have been given some idea and inspiration from this.
Don't forget to leave some love !
TFL
Simone XXX
Oh and Merry Christmas! ;)


